Saturday, December 24, 2011

What is your traditional Christmas dinner?

Merry Christmas to all! I have just finished my prep for tonights dinner. My mom and mother-in-law were both Polish so we always have ham and polish sausage. Lucky for us we do have a eastern European meat market close and get a traditional polish ham and sausage. We waited in line for 1 1/2 hours on Wed but it is well worth it. Much less salty than the grocery store hams and sausage is fresh.

Also having sweet and sour cabbage, mashed potatoes, deviled eggs, veggie and rolls. For desert a coconut cream pie, Hungarian (my father-in-law was Hungarian) nut roll and poppy seed roll (we call them kolach) and some assorted cookies.

Also as you can see my tree has tinsel. Another tradition. My mom loved tinsel. One year we had an aluminum tree and she still put tinsel on it. Do you tinsel?

What is your traditional dinner? Hope all of you have happy and safe holidays.

Monday, December 19, 2011

A little progress


I have been working on this off and on for the last few weeks. Progress has been slow with all of the holiday prep going on. I think I am also suffering from a little project fatigue. This thing is really big and still sooooo much to do.

I spent several hours glue basting before I could start working on the water. Then I spent about 2 days creating the water fall. I really enjoy this part since water is a real challenge and something I find very satisfying.

As you saw in my previous post, I use chalk to sketch out the flow of the water. The next step is to put down the base water fabric and chalk in the flow again. I spend a lot of time contemplating what I want to do and redrawing the flow helps me through this process. The flowing water is created using angle hair, batting and very thin sheets of Angelina fibers that I rip into small shreds. The angle hair is made of spun glass so I wear gloves while working with this. The water still needs a layer of tulle over it to keep it all in place. When I quilt the water I will follow the flow of the falls with clear thread and then maybe use a few metallic threads for highlights.


I also added this small tree to the right of the falls. These are the kind of details that get me in trouble since I can literally spend hours rearranging leaves and branches and will probably do more work on this tree when I look at it again.

Here is a closeup of the foliage. I used 3 different greens and you can see from the picture that nothing is glued down yet. Te create leaves I cut a hunk of fabric and use a snipping motion with small sharp scissors while turning the fabric in different directions to get a more natural look. The amount of holes I cut in the fabric varries depending on how dense I want the leaves to appear. This makes a really big mess on the floor but that is part of the fun. I'll keep plugging away and keep you updated.

Tuesday, November 22, 2011

Project update


Here are the last set of pics that I took last Friday. I have only had about 3 hours to work on this in the last week and most of that time was using my glue stick and 'basting' things in place. I use just enough glue to hold things down so I can get the piece to the sewing machine. I am still far away from that step as you can see.

The major changes you can see since my last post is the addition of the base water fabric and the rough in of the land at the base of the falls. I have been trying to refine the rocks and have also added some layers of small trees at the top of the falls.

At this point since I have the basic layout done I kind of bounce around and work on small sections of details based on the mood I am in and what grabs my attention for the moment. I am wanting to start on the waterfall but I still need to get more details done around it. I hope I can get in several hours tomorrow so stay tuned.


Tuesday, November 15, 2011

I want to catch everyone up on the project I talked about yesterday. Even though the previous post is dated Sat, I finished it last night and posted it then. I actually started this piece on Sunday 11/6 and have worked on it 5 of the last 9 days. I have been in NC for the last couple of days and just got home tonight and am looking forward the working on this quilt for a few hours tomorrow.

This is a good thing since I was really engrossed for the fist 6 days. I haven't looked at it yet since I got home and want a fresh perspective tomorrow. So here is more on my process and progress.

In the post yesterday I talked about how I first just block in the basic design. I have no fear in cutting up my fabric and try to make choices that will be used in the final quilt. At this point the only fabric that is attached to the base is the distant trees at the top.

On day 2 I only did a little bit of refining the tree shapes at the top. Day 3 was busy. I took down the rock fabric and started to work on creating detailed rocks. I also added the brown fabric (used front and back) for the ground. These are still no where near finished but this is a good start.


Here is the left side and a picture of the start of drawing in some tree details with fabric marker.


At this point I do a lot of stepping back and just looking. I work on both sides of the quilt. I free form cut all the pieces and place them on the background. No gluing yet so a big sneeze or draft could wipe away hours of work. Well, late again so I will try to post again tomorrow.

Saturday, November 12, 2011

New project


About 3 weeks ago Maria Elkins spoke at our guild. If you are not familiar with her work you can read about her here. She had just found out that one of her quilts had won one of the major awards at the International Quilt Festival in Houston. She started the quilt on May 16th and had it finished in time to meet the show deadline of June 1st! Here is the picture I took of her quilt 'Windswept' at the show.

Hearing her story really inspired and motivated me to create something I haven't done in quite a while.....make a quilt that I consider show quality. It seems like I have had a lot of starts and stops in the last year or so and haven't seemed to be able to stay focused on creating a piece I am really proud of.

Now you might think that I would do a small to medium piece but noooooo..... I have started a landscape that is 4ft wide and 6ft tall. The piece is based on a picture that I took about 4 weeks ago when we took a drive on the Cherohala Skyway which is close to our home in NC. I plan to share my process and post progress here on a regular basis. So here is what I did on day 1 of the project.

I use raw edge applique to make my landscape quilts and step 1 is to create a base to work on. The sky fabric is a hand dye by Stacy Michelle and the bottom is a piece of an old sheet. I find starting the most difficult step since now I am facing a big blank space that needs to be filled.

Next I start adding large pieces of fabric to give me more insight into where I am going and I seem to work better once I can get something up on the wall. You can have now fear in cutting up your fabrics and I do adulation and try to select fabrics that will be used in the final piece. The next picture shows what it looks like after about 5 hours on day 1.


I know this isn't very impressive but now I have a better idea of where I want to go with this. I used chalk to sketch in the basic flow of the water. I didn't crop this picture so you can see the size of the piece. That is a chair just to the right of the quilt. I will post more tomorrow.

Friday, October 21, 2011

I must be on a roll....

This has been quit a week! On Monday I found out about the viewers choice award mentioned below. On Wednesday I got an email informing me that the above picture of my granddaughter Julia (on the left) and her BFF Kassidy was accepted into the photo exhibit for the IQF in Houston.

Yesterday I picked up 3 other quilts that were in the Misty Mountain Quilt show and found out that I had also won a 3ard place for my quilt 'The Face of Envy, a second place for 'On the Riverbank' and a first place for 'Birthday Wishes'.

I also found out yesterday that my quilt 'Countryside' (shown under the 'Another Landscape' post) won an honorable mention in the Georgia Quilts show that is this weekend. So I think it has been a pretty good week.....

Wednesday, October 19, 2011

A first for me!

This is a picture of my quilt 'Peak Performance' being awarded the viewers choice award at the Misty Mountain Quiltfest held last weekend in northern Georgia. It also won 1st place in its category of mixed technique.

This was really exciting news since I have never won a viewers choice award before. I can hardly believe that the people voted for my quilt over all of the other 250+ quilts in this show. I wish I could thank each and everyone of them!

Thursday, September 15, 2011

Another Landscape

Here is 'Countryside'. The picture is not a good one and the color looks faded out. I had fun creating this and have decided to refocus on my first love in quilting which is landscapes.

My 'Creating Realistic Landscape Quilts' class starts on Jogggles.com on 9/20 and you can read the details about it here.

Wednesday, September 14, 2011

Texture reveal


I had no plan for this quilt only the looming deadline to get it done. I started by pulling fabrics and finally found this golden yellow piece that had rust and olive lines that reminded me of distant trees. I also found some crinkled organza, a brown and black large onion print, a blue gray with random thin black lines and green silk roving.

I put the design together in a couple of hours and quilted it the next day. I usually don't like works that I 'throw' together but for some reason I do like this. I started by pinning the background to my design wall. I folded the blue gray and brown onion print in half and cut the bushes and trees so each would have a mirror image.

I put some tan organza behind the trees to try to get a feeling of fog or mist and put the crinkled organza on top of the reflected trees to get a feeling of water. Lastly I scrunched up the green roving to look like shrubs ove the trees and stitched black tulle over it to hold it in place.

See the other 'texture' pieces by clicking on the 'Fiberactions' button on the right.

Wednesday, August 3, 2011

So do you really want a critique?

I find this an interesting subject. I have been in several art quilt groups and I really would like constructive feedback on my work. I have given several suggestions to have feedback sessions included on a regular basis for those who would like it and have always been turned down with the reason being that people really didn't want to hear what we really thought about their work.

I know this is a sensitive subject and can be hard to take but how can you learn and grow as an artist if you cannot get true feedback about what you produce. The piece I made for the 'departure' challenge in my eyes is marginal at best and when I put up the post I really wanted feedback on what you really thought. I find it interesting that I only have 1 comment so maybe some of you did not like the piece. I know that everyone has different taste and that art is subjective but do most people only just want to hear how wonderful their work is? Back to my friend Suzanne's statement, "Is it art or just crap?"

I would love to start a group where critique sessions where accepted and appreciated. It is so hard to subjectively or objectively evaluate your own creations. What are your thoughts on this subject?

Wednesday, July 27, 2011

Brave New World......


Yes, this is me! Last night I did a presentation for the Spirited Quilters Guild in Duluth GA. This was my first guild presentation and I think it went well. I want to give a special thanks to Karen Gornall, the programs coordinator, for giving this novice the opportunity and to everyone else for making me feel so welcome.

I had a great time and am looking forward to more guild engagements.

Saturday, July 23, 2011

Look What My Students Did!

Rhonda's quilt

Connie's Quilt

Betty's quilt

Last Saturday I taught another 'Beginning Landscape Quilting ' class. It was a lot of fun and the students did a great job. Look at some of the fabulous results.

Friday, July 15, 2011

Departure reveal - 'Off The Grid'

Here is my piece for the Fiberactions 'departure' challenge. Check out everyone's work here. This is a 'departure' for me. It all started with the 4 blocks below that I handpainted and then quilted and then decided 'what was I thinking'....


I cut apart the four squars and then cut each into 4 pieces. I arranged and rearranged until I was happy with the layout and zizzagged it together. Thought it still needed more and used puffy paint to paint the squiggley squars on top and then rubbed them with copper paint. Still need more and found some nylon screening material and cut out some to add to the top.

My friend Suzanne has a saying she uses to describe some quilts: 'is it art or just crap'. Does this apply to this piece. What do you think?

Monday, June 27, 2011

Triple Berry, Raspberry, Sweet Squash Relish, Wild Blackberry

At our house in NC for the weekend and have been busy. I did work on my sewing room setup here and now have a project on my new design wall. My first attemps at canning have worked out well.

Wednesday, June 22, 2011

I have been up to something.....

My blogging has gone by the wayside again.........

However I have been busy. Here are 2 small landscapes (about 30" x 24") I created as samples for a 'Beginning Landscape Quilting Class'. I had my first one last Saturday at the Atlanta Sewing Center in Marietta and will teach this again next month at the Duluth location. It was really fun and rewarding to see what the participants were able the create.


I am also preparing to give a talk and teach a class at a local guild in Duluth at the end of July. I am always up for a new challange and this will be one....... I guess I should start working on my talk.


A big garden at our NC house has also been taking a lot of time. I made my first batch of jam a couple of weeks ago and now decided I must really be getting old since I plan to try my hand at some canning. Hope everyone is having a great summer!


Sunday, May 15, 2011

Embellish Reveal


A couple of weeks ago I actually cleaned and organized my work space! This was really a major accomplishment since I was at the point where it was a total disaster and I could hardly find anything. In one of the layers I uncovered this 'tie painted' fat quarter that I must have done a few years ago. I immediately knew I had to use it for this challenge.


I used about 15 different threads for quilting and spruced up some of the flowers with additional paint, beads, crystals, yarns and hand stitching. I couldn't stand the thought of squaring this piece since I would have lost so much of the flowers so I used my rotary cutter freehand to create the uneven look. I pulled hard on the edgers while stemming them so they would slightly ruffle. I had fun with this one and really love this piece. Click on the Fiberactions box on the right to see the other pieces created for this challenge.

Sunday, March 27, 2011

It's new to me.....

A couple of weeks ago I bought a used Bernina Artista 180e to keep at our house in NC. Here is a picture of all of the stuff right after I wheeled it into our house in GA. It came with 8 different feet, embroidery software and hoops and all of these cases full of miscellaneous stuff. I bought it from someone who works at the Atlanta Sewing Center. It has 87 hours on it and has been serviced every year so it has been well cared for. The owner was upgrading to a different Bernina. I have never owned a Bernina and am excited about the machine. Any tips from some of you Bernina owners. Also, how is it for free motion quilting?

Thursday, March 17, 2011

Impression Reveal


Here is my quilt for latest Fiberactions challenge. I made this based on the above photo that I took in Venice a couple of years ago. I was trying to go for a more abstract look but as you can see my brain does not do abstract very well.

For this quilt I was also inspired by a new book that I got early last week. It is 'Quilted Symphony ' by Gloria Loughman and I highly recommend it. I was working on another quilt for the challenge but I really was just not excited about it so I started this one last Tuesday. First I cropped a section of the photo and printed it with the tile option on 4 sheets of paper. I used this as my pattern.

I then traced it on freezer paper and used the freezer paper as templates to cut the pieces. I used Steam-a-seam Lite as the fusible and after I was happy with my fabric choices I ironed them in place on a muslin backing. Of course this process took much longer than expected and I put in some late nights to make the deadline. I cut the dome pieces from 1 piece of batik and this took quit a bit of fussing to get the colors like I wanted them (it has over 50 pieces). I am not a big fan of fusing and I did find the quilting a bit challenging with the extra bulk of the fabric. Maybe one of these days I will tackle a quilt of the entire photo......now that would be an accomplishment!


Wednesday, March 2, 2011

What to do with this?

This is another UFO from almost a year ago. I was sick with an ear infection last year and still wanted to do something. I painted these 12 squares of fabric over a couple of days while recovering. They were then pieced together to create this quilt top. I liked it at the time and even started to quilt it (the four squares in the upper right are quilted). Now when I look at this I wonder what I was thinking.

The question is now what, if anything, to do with this. I have it hanging on my design wall so I can ponder it in passing. If I just abandon it I can salvage most of the batting and backing fabric. I could also use the unquilted squares as backing for another quilt. Of course the real challenge would be to rework this and turn it into something I like. I think this may be on my wall for a while since I am working on my Fiberactions piece that is due on the 15th. Any suggestions would be appreciated.

Tuesday, February 15, 2011

UFO Attack!

I am really itching to start something new but I also have been feeling the pull of my UFO's. Can you believe that I have finally gotten around to quilting my 'Flight Over Greenland II'. If you have been following my blog you may recognize this piece as a whole cloth that I painted in the summer of 2009. I am almost embarrassed to admit that. The problem I was having was figuring out how I was going to quilt this. You can see the original post on how I painted this here.

I put a layer of Warm and Natural on the backing and then a layer of 50% wool/cotton batting for the next layer. Next the top.


I started the quilting with white Isacord thread for the mountain tops, then light blue for the rest of the mountains. For the water I used a medium blue and clear thread for the sky. I must say that I love how this turned out. I was really excited about the piece and called my husband down to look at it.....he burst my bubble and had a very cool reaction to the piece. Guess it is hard to evaluate your own work but not to be discouraged I entered this in the Indiana Heritage Quilt Show.

This will be my 4th year entering this show and I have won a couple of first places and a judges choice so wish me luck. You can see a couple of up close photos and I really think it looks 3D. What do you think of this piece? I would really appreciate you true opinion. Thanks!

Wednesday, February 9, 2011

City and Guilds Award

Here is part of the email I received yesterday:

I am pleased to inform you that you have achieved your City and Guilds Award in Creative Techniques in "Sampling - Exploring Potential of Ideas and Materials". Your work was of an excellent standard and you have achieved the highest grade of Distinction.

I am excited!!!!

Wednesday, February 2, 2011

'Journal Spilling' on fabric


I just joined a small group of art quilters that meet every other month and create a small work based on a theme. This challenge was 'inspired by fruit' and was one of the pieces I was struggling with when I wrote the previous post.
One of the books I love is 'Journal Spilling' by Diana Trout. You can see it pictured below and read about it here on Amazon. I decided to journal spill on fabric and made this 9 1/2 x 10" little piece.
I used the Pastel Dye Sticks pictured (these were great and only $3.99 for the box of 15 colors!) to draw the apple on a square of PDF fabric. Then I wrote random thoughts about an apple with different colored markers. I dry brushed on different colors of fabric paint and finally did some thread painting and quilting. This was a fun little project.

Sunday, January 30, 2011

Looking for inspiration...

I have been trying to get some ideas for a couple of projects that I need to work on. Sometimes I just seem to get stuck and spend time in my work room aimlessly looking through books and fabric trying to come up with an idea. Friday I was having just one of those days .


I made myself a salads for lunch and then noticed the ends of the romaine lettuce that I had just used. Loved
how they looked like flowers and
decided to try some vegetable prints. The fabric on the left is one I pleated and painted a year or so ago so and used it for the background for printing. I have no idea what I will do with this but it was fun. Still no great ideas so I just kept looking at stuff and pulling out more books and fabric.


I found the scrap below on my painting table. I have been using it to test colors and clean my brushes. I am sure it has possibilities for something. What do you do when you are having a creativity block and how do you get past it?


Wednesday, January 19, 2011

Aftermath of the creative process...

I don't know about you but when I finish a project my work space is a total wreck! I took this picture after I completed the quilt below and this is what my work table looked like. I should have taken a picture of the floor in front of my design wall since when I do free form cutting I just let all bits and pieces fall to the floor and based on the project it can get pretty deep. I have actually tried to do the 'clean as I go' approach but somehow it seems to distract from my creative process. Maybe I will try to work on this again this year. Do you also make a big mess????

Saturday, January 15, 2011

'Environment' Reveal

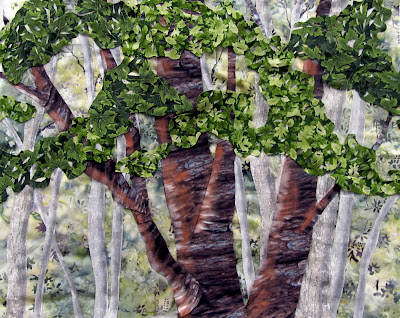
Here is my quilt for the Fiberactions group challenge. The word was 'environment'. To me nothing is more important to our environment than the relationship between plants and animals. Each supports the existence of the other and hopefully we can find peace between us. A few years ago during the house building boom in the Atlanta area, I read an article stating that this area was losing on average 40 acres of trees per day due to new construction. Maybe something positive can come from the downturn in the economy.

I love creating trees so I really enjoyed making this piece. I started digging through my stash and found the border fabric first. Next came the background and tree fabrics. I placed the background fabric directly on a piece of wool batting on my design wall and then created the design. I work free form by cutting pieces of fabric as I go and placing them where I think they should go using pins to hold things in place. This is an iterative process and I move things around until I am happy with the design. Then I use a glue stick to secure all the pieces to the background using just enough so I can get it to the sewing machine to sew thing in place.

I usually don't place the background on batting but I wanted to see if I could add more dimension by adding the extra layer at this stage. I then did some highlighting with thread sketching, paints and pastels on the branches. I quilted it and after trimming it and zigzagging the edges, I placed it on the border fabric that had been layered with another piece of batting and backing fabric.

Now I sewed around all of the elements again. The branches really popped. I tried to hold a light at an angel and take the picture from the side so I hopy you can see this in the picture below.

Adding the bird was a suggestion made by my husband. I painted it on a piece of white cotton, cut it out an the stitched it to the quilt. I wish I would have added it earlier since it does not have the dimension of the tree limbs.

I then added the yarn trim around the center panel to cover up where I had stitched it to the border fabric. Now I quilted the border, painted some highlights on the water and gave the branches a few more high and low lights.